Seam Construction
We build our gear to last in even the harshest conditions, we know the best way to cut, sew, and seal our fabrics so that it can survive any expedition you embark on.
TYPES OF SEAMS
![]() SIMPLE EDGE SEAM: Ideal for lightly loaded exterior seams. Easiest to seam seal (single line on exterior only). Down proof, soft and flexible, maintains about 70% of fabric strength. Double stitch may be used for security but does not increase strength.
SIMPLE EDGE SEAM: Ideal for lightly loaded exterior seams. Easiest to seam seal (single line on exterior only). Down proof, soft and flexible, maintains about 70% of fabric strength. Double stitch may be used for security but does not increase strength.
![]() SIMPLE FLAT LAP: For flat construction requiring highest strength. Single stitch used where it will be seam sealed between the lap forming an adhesive bond as strong as the fabric. Double stitch achieves up to 95% of fabric strength. Difficult to seal due to through stitches. Thread exposed to wear. Sails are often zigzag stitched both to hold edges flat and to make seams easy to rip out for shape adjustment, but zigzag will not wear near as long as straight stitch. If edges are tucked under to hide them, as is necessary on fabric that frays, it is called a flat felled seam. Automatic folders makes it one of the easiest to sew, and thus seen on almost all mass produced tents.
SIMPLE FLAT LAP: For flat construction requiring highest strength. Single stitch used where it will be seam sealed between the lap forming an adhesive bond as strong as the fabric. Double stitch achieves up to 95% of fabric strength. Difficult to seal due to through stitches. Thread exposed to wear. Sails are often zigzag stitched both to hold edges flat and to make seams easy to rip out for shape adjustment, but zigzag will not wear near as long as straight stitch. If edges are tucked under to hide them, as is necessary on fabric that frays, it is called a flat felled seam. Automatic folders makes it one of the easiest to sew, and thus seen on almost all mass produced tents.
![]() INSERT SEAM: Variation on simple flat lap used to attach an edge in middle of a panel.
INSERT SEAM: Variation on simple flat lap used to attach an edge in middle of a panel.
![]() TUCK STITCH: A variation on insert seam that hides the thread on outside, makes a stiff, lumpy seam and puts exterior fabric loads directly on thread.
TUCK STITCH: A variation on insert seam that hides the thread on outside, makes a stiff, lumpy seam and puts exterior fabric loads directly on thread.
![]() EXTERIOR EDGES: Folded in, makes a neat balanced seam with minimum bulk.
EXTERIOR EDGES: Folded in, makes a neat balanced seam with minimum bulk.
![]() ROLLED: For hiding edges that are likely to fray.
ROLLED: For hiding edges that are likely to fray.
![]() Other methods: BOUND, and SERGED zigzag over edge, often used on knits and cheap clothing.
Other methods: BOUND, and SERGED zigzag over edge, often used on knits and cheap clothing.
The use of flat felled seams only proves edges are hidden, which isn’t necessarily good and may even be bad.
BAFFLING FOR DOWN CONTROL
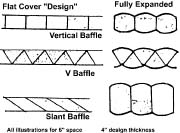
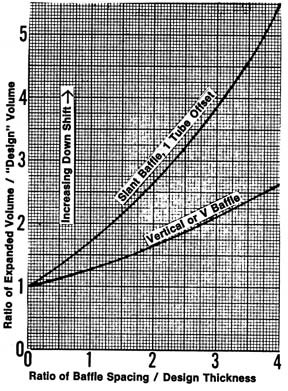
 Designing a Down filled sleeping bag from an engineering viewpoint, it’s obvious you need to limit the spread from inner to outer covers to the thickness the Down can expand to, and need to prevent the Down from shifting when expanded in use. Vertical strips of fabric, called baffles, will accomplish both objectives. Free expansion of the Down could curve the fabric surfaces out between baffles by an amount determined by thickness and width between baffles, but in real life the weight of Down and fabric flattens the inside to conform with the occupant. Thus the thickness varies only about 1/2 as much as calculated for free expansion.
If the volume of Down equals the free expansion volume of the bag there is no space for the Down to shift to, so it stays in position. Any lengthwise shift between inner and outer cover will tilt the baffles and thus compress the Down slightly. If the free volume in the bag is more than volume of fill, then the Down can easily shift off to lower side area leaving a thin cold top. That will happen if the baffles are too wide for the fill, or are spaced far apart.
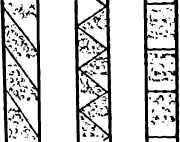
 Unfortunately many bag designs evolved from sewn through quilts. To eliminate cold seam lines someone put a quilt over a quilt with the seams offset, to eliminate the extra layer of fabric in the middle someone sewed a middle layer alternately from inside to outside. Viewed from the side the inner baffle layer formed a series of wide V shapes, so it was called V baffles. That worked but it still had the weight of excess fabric. As with the vertical baffles, the outer surface will arch up between seams while the inner surface conforms to the occupant. Any lengthwise shift between covers compresses the Down much more than for vertical baffles. Most baffles go across the bag from side to side. At times someone makes bags with baffles going the length of the bag. It is easier to make this way and easier to contour a bag around you, but packing tends to cause large shifts, so it takes a lot of effort to get the insulation uniform again before use. If you shift the Down for warmer conditions it can be almost impossible to fluff it back from inside the bag. In the 1950’s Roy Holubar was producing excellent V baffled bags, and did a lot of promotion on the idea that the thin edges of each “tube” was overlapped by the thick middle of adjacent tube (ignoring the obvious that the baffle was just angled through a uniform thickness of Down). To make a lighter weight lower cost bag he went to baffle strips instead of full interior V’d layers, and to stick with his “overlapped tube” argument he put the baffles on a slant, like 1/2 of a V, that would have been fine if the materials were rigid and non-moveable. As with the V baffle, shift of covers in ONE direction over compressed the Down, but when covers shifted the other way it grossly over lengthened the vertical baffles, letting the Down easily fall off to one side. Disaster? Only to the user, not the salesmen. On display in stores bags are hung vertically, in a way that holds covers in alignment. With “slant baffles” even a 50% underfill looks good: the empty areas of one tube are covered by filled area of next.
 One big advantage of Down over all other insulators is that the insulation can be adjusted by shifting it. On warm nights, compress the Down into the ends of cross tubes with gentle directed pats, thinning the top (this is difficult in V baffled bags). If you feel cold later, simply pat the sides freeing the Down to expand into the middle for more insulation.
Conclusion: vertical “direct tension” baffles are best, providing the same uniformity of thickness as V baffles at same spacing, but with less weight, less sensitivity to motion, and easier thickness adjustment.
